
For many of the students I work with, some of whom have complex communication needs and/or relatively limited experiences of generating language, writing presents many challenges. To develop writing skills they need to learn to generate an idea, to think about language, think about the words, the spelling, controlling their “pencil”, etc.
For many people, the act of learning to “write” is firmly enshrined in the concept of learning to handwrite. Learning to write includes learning to hold a pencil, make strokes, move it across a page, master letter shapes, etc. Sometimes students are held back from writing instruction until they have developed these motor based skills, as if they are critical to writing success.
BUT in a typical day, for me, I don’t use any of these skills to write at all. This is despite that fact that today I have done lots of writing. I’ve sent 13 emails, I made comments on a document someone sent me, I sent a Skype message and I’m writing this blog post. All of this writing was done on a computer with a keyboard. I have also sent text messages, Messenger messages and added an appointment to my diary. This writing was done using my phone and an onscreen keyboard. At no point today did I actually pick up a pencil and do some handwriting. The world of writing is changing – and it needs to change for the students we work with. For years we have been talking about using “alternative pencils” with students who cannot manage the motoric demands of a traditional pencil. But the reality is that all of us use “alternative pencils” all the time. When I first started working with assistive technology nearly 30 years ago, on-screen keyboards were something we used with a very small number of clients – but today most of us use them every day on phones and tablets. In fact, we use multiple writing tools each day and handwriting is a minimal part of that mix.
For the students who are in schools right now, think about how they are going to write when they leave school. Will they write a letter – and if they do will they handwrite it or type it? Are they far more likely to simply send a text message or an email? Will they be on social media? Will they play online games and join online forums? Will they comment on YouTube videos? How many of those tasks are able to be completed with handwriting? The only thing I regularly use handwriting for is a couple of lists on my fridge that I want other family members to also see. But – if I needed to I could easily turn these into electronic lists too. This means that the most important tool for the current generation of students to learn to write with is a keyboard. The world of writing is changing – and we have to change how we view it. This year, I am going to stop myself using the phrase “alternative pencils” and simply call each and every option a writing tool.
For those of you in Australia, in the previous version of the Australian Curriculum we were encouraged to ensure that students wrote as much with technology as they did with a pen or pencil. In the current version, handwriting is given very little attention at all. Instead Australian Curriculum recognises that students need to develop a number of skills in the area of writing and that ANY writing tool can be used to do this. In the first year of school there is one handwriting goal and also one computer/keyboard writing goal. All the other goals simply use language like “create texts.”
Think about my description at the beginning of this blog post of the different skills that students need to develop as writers. “To develop writing skills they need to learn to generate an idea, to think about language, think about the words, the spelling, controlling their “pencil”, etc.” The complexity involved in becoming a writer means that we want to help each student to find the simplest writing tool for them. We want to make their writing tool something that uses minimal physical and cognitive energy so that they can focus on all the other aspects of writing development.
And so, here’s a writing tool suggestion and selection guide. This is only a guide – it isn’t a definitive list. My suggestions for use are suggestions only – the variety of students that we work with means that we are always having to be creative and resourceful!
Flip Charts
Flip charts were originally developed by the amazing folk at the Centre for Literacy and Disability Studies. They are gold – tools that I implement each and every week with a range of emergent writers. There is a treasure trove of these flip charts available to download at https://www.dlmpd.com/instructional-resources/. Click on the tab labelled “writing resources” to access them. (Edited to add: I have also a number of flip charts available for download at https://www.comprehensiveliteracy.com/writing-by-me.html#/)
Blue and white squares flip chart
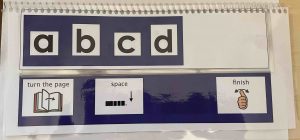

- This is the flip chart I use most of all
- White boxes around the letters, emphasising letter shape
- Lower case
- (Upper case could be used by the teacher to model writing but otherwise shouldn’t be needed as the students we would use this with are scribbling)
- In alphabetic order, with each page starting with a vowel
- Four or six letters per page
- Side flaps with finish, turn the page and space that can be folded away if not needed
I use this with students who:
- Are emergent
- Can point with their hand or other body part (except eyes)
- Have good vision
Below is a link to download the file for the blue and white squares flip chart with Australian symbols.
Eye Gaze Flip Charts
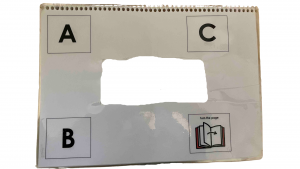
- In alphabetic order
- Made up with an eye gaze hole in the middle of each page so we can see which letter the student is looking at
- Three letters per page and a turn the page symbol
- Finish and space on last page
I use this with students who:
- Are emergent
- Need to access the alphabet through eye gaze OR
- Use a whole hand or other body part for pointing that requires a greater level of space.
- Lower case regular contrast for students without a visual impairment
- High contrast upper case for students with a vision impairment; saturated colours (yellow, pink, etc) for students with cortical vision impairment; white on block for students with vision impairment
Below are links to download the files for the eye gaze flip charts pictured above:
High contrast, three letters per page flip charts
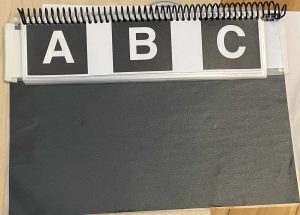

- Direct access or Partner assisted scanning (PAS) for students using horizontal PAS
- Upper case high contrast for students with a vision impairment; saturated colours (yellow, pink, etc) for students with cortical vision impairment; white on black for students with vision impairment
- Larger letters, three per page
- May need to be made up at at A3 size
- Alphabetic order
I use this with students who:
- Are emergent
- Have a vision impairment
- Use direct access or horizontal partner assisted scanning
Below are links to download the files for the 3 letter per page flip charts pictured above
Vertical Partner Assisted Scanning Flip Charts
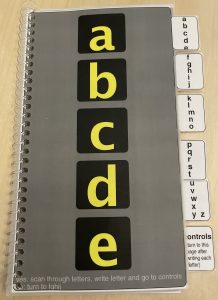

- Partner assisted scanning (PAS) for students using vertical PAS
- Regular contrast, lower case for students with no vision impairment
- Upper case high contrast for students with a vision impairment; saturated colours (yellow, pink, etc) for students with cortical vision impairment; white on black for students with vision impairment
- May need to print at A3 size to enlarge
- Alphabetic order
- Three letters per page, turn the page symbol and a menu symbol to access the side menu
I use this with students who:
- Are emergent
- Are accustomed to using vertical partner assisted scanning, such as a PODD book
Below are links to download the files for the vertical PAS flip charts pictured above
High tech flip charts


I also make the flip chart up high tech in apps like Proloquo2Go, Abilipad, etc for some students. If you’re using Abilipad the flip chart is all made up and ready for download from their keyboard library. Just download it within the app and use it!
Other pencils for emergent students
This category is only limited by the things that can offer them access to the whole alphabet and that they will engage with. It’s important that all students have access to the whole alphabet even if it is broken into chunks like it is on the flip chart. Options I’ve had real success with are:
- Using bricks with the alphabet on them. You could make these yourself with Lego or Duplo bricks or buy ones with the alphabet already on them, such as the Coko Lower Case Educational Bricks
- The Word Wizard app. There is a section within this app called “talking moveable alphabet” that is a great pencil for some students.
- We’ve also had some students who are really successful with a Label Printer, such as the LetraTag printer from Dymo.
- Anything else??? Please make suggestions in the comments on this blog post!
Whole Alphabet Keyboards
- Used with students who know most of the letters of the alphabet, most of the time
- Can also be used by emergent students for scribbling as one of their range of options
Low Tech QWERTY (Two Sided)

- Direct access low tech keyboard
- Great as a backup for students when there aren’t enough high tech keyboards available
- Provides some students access to a QWERTY keyboard with reduced sensory demands (fewer keys, buttons don’t move and click)
- Photocopy double sided so that students can press the space key and flip the page to change case
- Provides consistency with high tech keyboards to assist with motor planning development
I use this with students who:
- Know most of the letters, most of the time
- Are pointing with their finger
Below is the link to download the QWERTY keyboard file pictured above
Standard keyboards

There are so many variations on the “standard” computer keyboard. Ergonomic, slim line, wrist pad, wireless, wired, light touch, with and without number keypads, backlit, etc. One of these changes can make a keyboard more suitable for a student – so it helps to have different options to trial. Unfortunately, though, they also come and go a lot – so you can trial the perfect keyboard and then not be able to buy it 🙂
High Contrast Keyboards

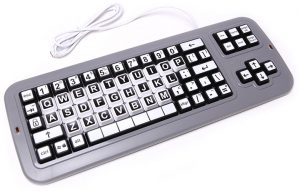
There are also a number of high contrast keyboards available. Some of them have bigger keys and some of the them simply have bigger key labels. You can also just buy high contrast keyboard stickers. For students with a vision impairment this can be a valuable option.
Keyboards with Keyguards
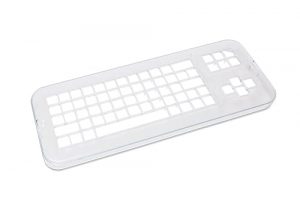

Perspex “keyguards” have been used with keyboards for a long time. Some are commercially available, such as the Clevy Keyguard above, and others have to be custom made. They can help someone who is typing with a tremor by reducing their miss-hits and providing them with a surface to rest on. They have also been great for reducing the sensory demands of a keyboard for some students.
I use keyboards with students who:
- Can type with one or more fingers
- Know most of the letters most of the time
- Keyguards are available for students who accidently press the wrong keys or need to rest their hand on the keyguard.
- High contrast (low vision) versions available for student who struggle to read the key labels
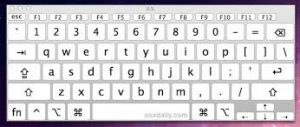
Onscreen Keyboards
These were once a very rare option! Today, however, they are built into almost every operating system. Windows, Mac, iOS, Android all have their own onscreen keyboards – and some of the apps we run also have a custom onscreen keyboard within the app.
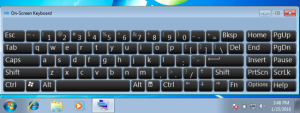

The Windows onscreen keyboard can be turned on through the Ease of Access centre. Once it has been turned on you can type using a mouse, touch screen – OR you can turn on the scan through keys mode and use a, alternative input device such as a switch to type.
Mac Onscreen Keyboard

The Mac onscreen Keyboard offers all the options available in Windows above. There is a little more flexibiity in settings which often give this the edge! Plus in the MacOS there are so many other Accessibility feature that you can pair with the onscreen keyboard so that an individual can access the whole computer.
iOS Onscreen Keyboard

If you have used an iPad or iPhone, you have probably used the onscreen keyboard. The Apple provided keyboard is compatible with all their Accessibility features – which means that I can use it with a single switch to type among other access options. Or I can use one or more fingers, or one of a range of styluses. I can also turn on the built-in iOS word prediction.
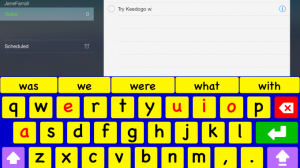
3rd Party iOS keyboards
I have blogged about some of these before. These are “apps” that you purchase through the app store and then activate – and you can use them instead of the iOS keyboard. Keedogo and Keedogo Plus are still favourites of mine. I love how many different tweaks these let me make for different students. I blogged about these in 2014.

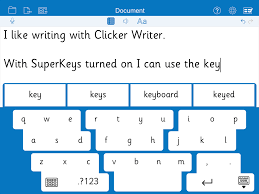
SuperKeys is another favourite. This is great for a student who needs a larger area to press. Watch the video on the Crick Software website to get a good idea of how it works.


And my other favourite keyboard for iOS is Co:Writer Universal. It has the brilliant Co:Writer word prediction included – and now you can use it with almost every other iOS app. Plus it will work on your computer (Mac or PC), your smartphone (even Android).
Eye Gaze and Onscreen Keyboards
The final thing I’m going to say about using Onscreen Keyboards is that a lot of them are also compatible with eye gaze controlled computers.
The End
Have fun writing. And you might even use one of the options below!!
 (Set of pens and pencils, tools for writing and drawing – but don’t blame me if your hand starts to hurt. Or is that only me?)
Sue Drouin
jane
Jocelyn
jane
Shannon Singleton
jane
Tim
jane
Laura Jones
jane
Pingback: Angelman UK Communication and Literacy Conference | Jane Farrall Consulting
Here
jane
Karina Denney-Bray
jane
Nicole Quast
jane
Lauren
Jane